
How to Set Up an Electron Project with React
I am assuming you meant Electron. If that is the case, this guide will show you how to set up a real Electron + React project from scratch, explain the moving parts in plain language, and give you a workflow you can actually use. Electron is a framework for building desktop apps with JavaScript, HTML, and CSS, and it bundles Chromium and Node.js so you can build apps that run on Windows, macOS, and Linux with one JavaScript codebase. React is a UI library for building interfaces from components.
This article uses a practical setup based on Electron Forge. Electron Forge is the official toolchain for packaging and distributing Electron apps, and its React guide is built around the Webpack template. Electron Forge also offers a Vite template, but its docs label Vite support experimental as of v7.5.0, so for a beginner-friendly setup that follows the official React guide closely, Webpack is the safer path here.
If you are new to this stack, do not worry about understanding everything at once. The point is to build confidence step by step. Maya, a junior developer, does not need to understand every build flag on day one. Omar, a freelancer, does not need to know the entire Electron ecosystem before shipping his first desktop utility. What matters is learning the shape of the project, the role of each file, and the exact command sequence that gets you from an empty folder to a working desktop app.
What you are actually building
An Electron app is not “just a React app.” It has two worlds:
the main process, which controls the desktop app window and talks to the operating system
the renderer process, which displays the interface, and in this guide that interface is built with React
That split is one of the most important things to understand early. Electron itself is designed to let you use web technologies for desktop apps, while React handles the UI layer inside the window.
Here is the mental model:

flowchart LR
    A[Electron Main Process] --> B[Creates and manages windows]
    B --> C[Loads React UI in Renderer]
    C --> D[User clicks buttons]
    D --> E[React updates interface]
    E --> F[Optional IPC to Main Process]
The main process is like the director. React is like the actor on stage. IPC, which means inter-process communication, is how they pass messages to each other when the UI needs something from Electron, such as opening a file, showing a dialog, or reading system information.
Why Electron Forge is a good starting point
The Electron team recommends starting from a scaffolded project instead of wiring everything by hand. Electron Forge provides built-in templates, including Webpack, TypeScript variants, and Vite variants, and its import tooling can also bring existing projects into the Forge workflow. Its configuration is centralized in a config.forge object or a forge.config.js file.
For this guide, that means one simple idea: start with the official Webpack template, then layer React on top. Electron Forge’s React guide says this setup does not require a complicated boilerplate, and it was tested with React 18, Babel 7, and Webpack 5.
That matters because beginners often get stuck when they try to combine too many tools at once. If you begin with the official template, you avoid a lot of hidden setup pain.
The setup we will use
We will build a project with:
Electron
Electron Forge
Webpack
Babel
React
React DOM
Electron Forge’s React guide tells you to add @babel/core, @babel/preset-react, and babel-loader so JSX and other React features work correctly, and then install react and react-dom in your dependencies. The guide also shows a minimal renderer example using createRoot from react-dom/client.
Here is the structure we are aiming for:
my-electron-react-app/
├─ src/
│  ├─ main.js
│  ├─ preload.js
│  ├─ renderer.js
│  ├─ App.jsx
│  └─ index.css
├─ .gitignore
├─ forge.config.js
├─ package.json
└─ webpack.rules.js
You do not have to use exactly this file layout forever. It is a clean learning layout that makes the project easier to read.
Step 1: Create the Electron project
The official Electron Forge Webpack template command is:
npx create-electron-app@latest my-new-app --template=webpack
After the template is created, the Forge docs say to run npm start in the generated directory. (electronforge.io)
So the first move is simple:
npx create-electron-app@latest my-electron-react-app --template=webpack
cd my-electron-react-app
npm start
At this point, you should already have a basic Electron app running. Electron’s own tutorial also explains that Electron apps are scaffolded using npm with package.json as the entry point, and that the development workflow is meant to get a working app running from the terminal.
If you are on Windows, Electron’s tutorial warns against using WSL for the first-app walkthrough because it can cause execution issues. That warning is specific to the tutorial, but it is worth keeping in mind if something strange happens during setup.
Step 2: Understand the generated project
The template gives you a base Electron project. That base already knows how to create a window and run a desktop app. Your job is to add React as the front-end layer.
Electron’s documentation explains that Electron apps are developed with a package.json entry point, and its installation guide says Electron is typically installed as a development dependency. If you are starting from a manual setup instead of a template, the preferred installation command is npm install electron --save-dev.
The important idea is that the Electron binary itself is bundled into the app during packaging, so it is not treated like a normal production web dependency. That is why the Electron docs describe it as a dev dependency.
Step 3: Install React and Babel support
Electron Forge’s React guide says to add the following development dependencies so JSX and React features are handled properly:
npm install --save-dev @babel/core @babel/preset-react babel-loader
Then install React itself:
npm install react react-dom
Those commands come directly from the official Electron Forge React guide.
Now let us write the config that lets Webpack understand JSX.
Step 4: Update webpack.rules.js
Electron Forge’s React guide shows a loader rule that matches .js and .jsx files and uses babel-loader with @babel/preset-react. A minimal version looks like this: (electronforge.io)
module.exports = [
  // ... existing loader config ...
  {
    test: /\.jsx?$/,
    use: {
      loader: 'babel-loader',
      options: {
        exclude: /node_modules/,
        presets: ['@babel/preset-react'],
      },
    },
  },
  // ... existing loader config ...
];
This tells Webpack to process React-style JavaScript syntax correctly.
A small human-friendly way to think about it:
Webpack is the packer
Babel is the translator
React is the UI authoring style
Without Babel, JSX would not be understood. Without Webpack, the app would not be bundled cleanly for Electron. Without React, you would be writing the UI by hand in plain DOM code.
Step 5: Create the main process file
The main process is where your Electron app starts. It creates windows and manages the app lifecycle. Electron’s docs describe that APIs that must run before the ready event should be called synchronously in the top-level main-process context.
Here is a simple src/main.js example:
const { app, BrowserWindow } = require('electron');
const path = require('path');

function createWindow() {
  const win = new BrowserWindow({
    width: 1100,
    height: 750,
    minWidth: 900,
    minHeight: 600,
    webPreferences: {
      preload: path.join(__dirname, 'preload.js'),
      contextIsolation: true,
      nodeIntegration: false,
    },
  });

  win.loadURL(`file://${path.join(__dirname, 'index.html')}`);
}

app.whenReady().then(() => {
  createWindow();

  app.on('activate', () => {
    if (BrowserWindow.getAllWindows().length === 0) {
      createWindow();
    }
  });
});

app.on('window-all-closed', () => {
  if (process.platform !== 'darwin') {
    app.quit();
  }
});
This is a standard Electron-style window lifecycle example. The code itself is ours, but it follows the official Electron model of creating the app window once the app is ready.
A short schema for this process:

flowchart TB
    A[app.whenReady] --> B[createWindow]
    B --> C[BrowserWindow opens]
    C --> D[React loads in renderer]
    D --> E[User interaction begins]
Step 6: Add a preload script
A preload script is a safe bridge between the main process and the renderer. This becomes important when React needs to call Electron APIs without exposing everything to the UI. Electron’s docs have a dedicated tutorial path for preload scripts, which shows that they are part of the normal Electron app structure.
A simple src/preload.js might look like this:
const { contextBridge, ipcRenderer } = require('electron');

contextBridge.exposeInMainWorld('electronAPI', {
  sendMessage: (message) => ipcRenderer.send('message:send', message),
  onMessage: (callback) => ipcRenderer.on('message:reply', (_, value) => callback(value)),
});
This is one of the most useful patterns in Electron apps because it keeps the renderer cleaner and safer.
If you are teaching this to a beginner, this is a good line to remember: the preload script is the controlled hallway between your React UI and Electron’s power.
Step 7: Create the React entry point
Electron Forge’s React guide gives a minimal React example using createRoot from react-dom/client, then rendering a component. It also shows importing that React code into the renderer file.
Here is a more complete src/App.jsx:
import React, { useState } from 'react';

export default function App() {
  const [name, setName] = useState('');
  const [message, setMessage] = useState('Welcome to Electron + React');

  const handleClick = () => {
    const displayName = name.trim() || 'friend';
    setMessage(`Hello, ${displayName}! Your desktop app is running.`);
  };

  return (
    <main className="app-shell">
      <section className="card">
        <h1>Electron + React</h1>
        <p>{message}</p>

        <div className="field">
          <label htmlFor="name">Your name</label>
          <input
            id="name"
            value={name}
            onChange={(e) => setName(e.target.value)}
            placeholder="Type your name"
          />
        </div>

        <button onClick={handleClick}>Say hello</button>
      </section>
    </main>
  );
}
And the renderer entry file src/renderer.js:
import * as React from 'react';
import { createRoot } from 'react-dom/client';
import App from './App.jsx';
import './index.css';

const rootElement = document.getElementById('root');
const root = createRoot(rootElement);

root.render(<App />);
That is the simplest human-friendly version of the React renderer. One component, one root, one clear purpose.
Step 8: Add the HTML shell
React still needs a container in the page. Your Electron renderer can load an HTML file with a root element. A basic src/index.html might look like this:
<!DOCTYPE html>
<html lang="en">
  <head>
    <meta charset="UTF-8" />
    <meta
      name="viewport"
      content="width=device-width, initial-scale=1.0"
    />
    <title>Electron React App</title>
  </head>
  <body>
    <div id="root"></div>
  </body>
</html>
This is the bridge point where React mounts into the page.
Step 9: Add some styling
A desktop app should feel like a real product, not a blank tutorial page. Here is a clean src/index.css:
:root {
  font-family: Inter, system-ui, -apple-system, BlinkMacSystemFont, sans-serif;
  color: #1f2937;
  background: #f3f4f6;
}

* {
  box-sizing: border-box;
}

body {
  margin: 0;
  min-height: 100vh;
  background: linear-gradient(180deg, #f9fafb 0%, #eef2ff 100%);
}

.app-shell {
  min-height: 100vh;
  display: grid;
  place-items: center;
  padding: 24px;
}

.card {
  width: min(100%, 640px);
  background: white;
  border-radius: 20px;
  padding: 32px;
  box-shadow: 0 18px 40px rgba(15, 23, 42, 0.12);
}

.card h1 {
  margin-top: 0;
  font-size: 2rem;
}

.field {
  display: grid;
  gap: 8px;
  margin: 20px 0;
}

.field input {
  padding: 14px 16px;
  border: 1px solid #d1d5db;
  border-radius: 12px;
  font-size: 1rem;
}

button {
  padding: 14px 18px;
  border: none;
  border-radius: 12px;
  font-size: 1rem;
  cursor: pointer;
}
This is the kind of styling that makes the app feel calm and usable. People notice good spacing before they notice architecture.
Step 10: Confirm the package scripts
Electron Forge’s import documentation shows the standard scripts it wires up in package.json:
{
  "scripts": {
    "start": "electron-forge start",
    "package": "electron-forge package",
    "make": "electron-forge make",
    "publish": "electron-forge publish"
  }
}
Those scripts are part of the normal Forge workflow. start runs the app in development mode, package prepares a packaged app, make builds installers, and publish uploads release artifacts if configured.
That script layout is one of the reasons Electron Forge is so helpful. It gives you a development path and a packaging path in the same toolchain. The docs also note that Forge’s build pipeline can produce installers such as Squirrel.Windows, ZIP, and deb via electron-forge make.
Step 11: Configure Forge in forge.config.js
Electron Forge says its configuration can live in package.json under config.forge, or in a forge.config.js file. The docs also say that using JavaScript for the config is recommended because it allows conditional logic.
A simple forge.config.js:
module.exports = {
  packagerConfig: {},
  rebuildConfig: {},
  makers: [
    { name: '@electron-forge/maker-zip' },
    { name: '@electron-forge/maker-deb' },
    { name: '@electron-forge/maker-squirrel' },
  ],
  plugins: [],
};
That is enough to start learning the shape of Forge config. The official docs list packagerConfig, rebuildConfig, makers, publishers, plugins, hooks, buildIdentifier, and outDir as supported configuration properties.
A practical project structure
Here is a tidy structure for a React + Electron app:
my-electron-react-app/
├─ src/
│  ├─ main.js
│  ├─ preload.js
│  ├─ renderer.js
│  ├─ App.jsx
│  ├─ index.html
│  └─ index.css
├─ forge.config.js
├─ webpack.rules.js
├─ package.json
└─ .gitignore
This layout keeps the responsibilities clean:
main.jshandles app windows and Electron logicpreload.jshandles the bridgerenderer.jsstarts ReactApp.jsxcontains UI componentsindex.csscontrols styles
That separation matters because desktop apps become hard to maintain when everything is thrown into one file.
What a simple IPC example looks like
Now let us make the app feel more real.
Suppose the renderer wants to send a message to the main process. Here is a simple Electron IPC setup.
Main process
const { app, BrowserWindow, ipcMain } = require('electron');
const path = require('path');

function createWindow() {
  const win = new BrowserWindow({
    width: 1100,
    height: 750,
    webPreferences: {
      preload: path.join(__dirname, 'preload.js'),
      contextIsolation: true,
      nodeIntegration: false,
    },
  });

  win.loadFile(path.join(__dirname, 'index.html'));
}

ipcMain.on('message:send', (event, message) => {
  event.reply('message:reply', `Main process received: ${message}`);
});

app.whenReady().then(createWindow);
Preload script
const { contextBridge, ipcRenderer } = require('electron');

contextBridge.exposeInMainWorld('electronAPI', {
  sendMessage: (message) => ipcRenderer.send('message:send', message),
  onReply: (callback) => ipcRenderer.on('message:reply', (_, value) => callback(value)),
});
React component
import React, { useEffect, useState } from 'react';

export default function App() {
  const [input, setInput] = useState('');
  const [reply, setReply] = useState('No message yet');

  useEffect(() => {
    window.electronAPI.onReply((value) => setReply(value));
  }, []);

  const handleSend = () => {
    window.electronAPI.sendMessage(input);
  };

  return (
    <section className="card">
      <h1>IPC Demo</h1>
      <p>{reply}</p>
      <input
        value={input}
        onChange={(e) => setInput(e.target.value)}
        placeholder="Send a message"
      />
      <button onClick={handleSend}>Send</button>
    </section>
  );
}
This is the moment many beginners finally understand why Electron is interesting. React draws the UI, but Electron gives the app powers that a normal browser page does not have.
A schema for IPC flow
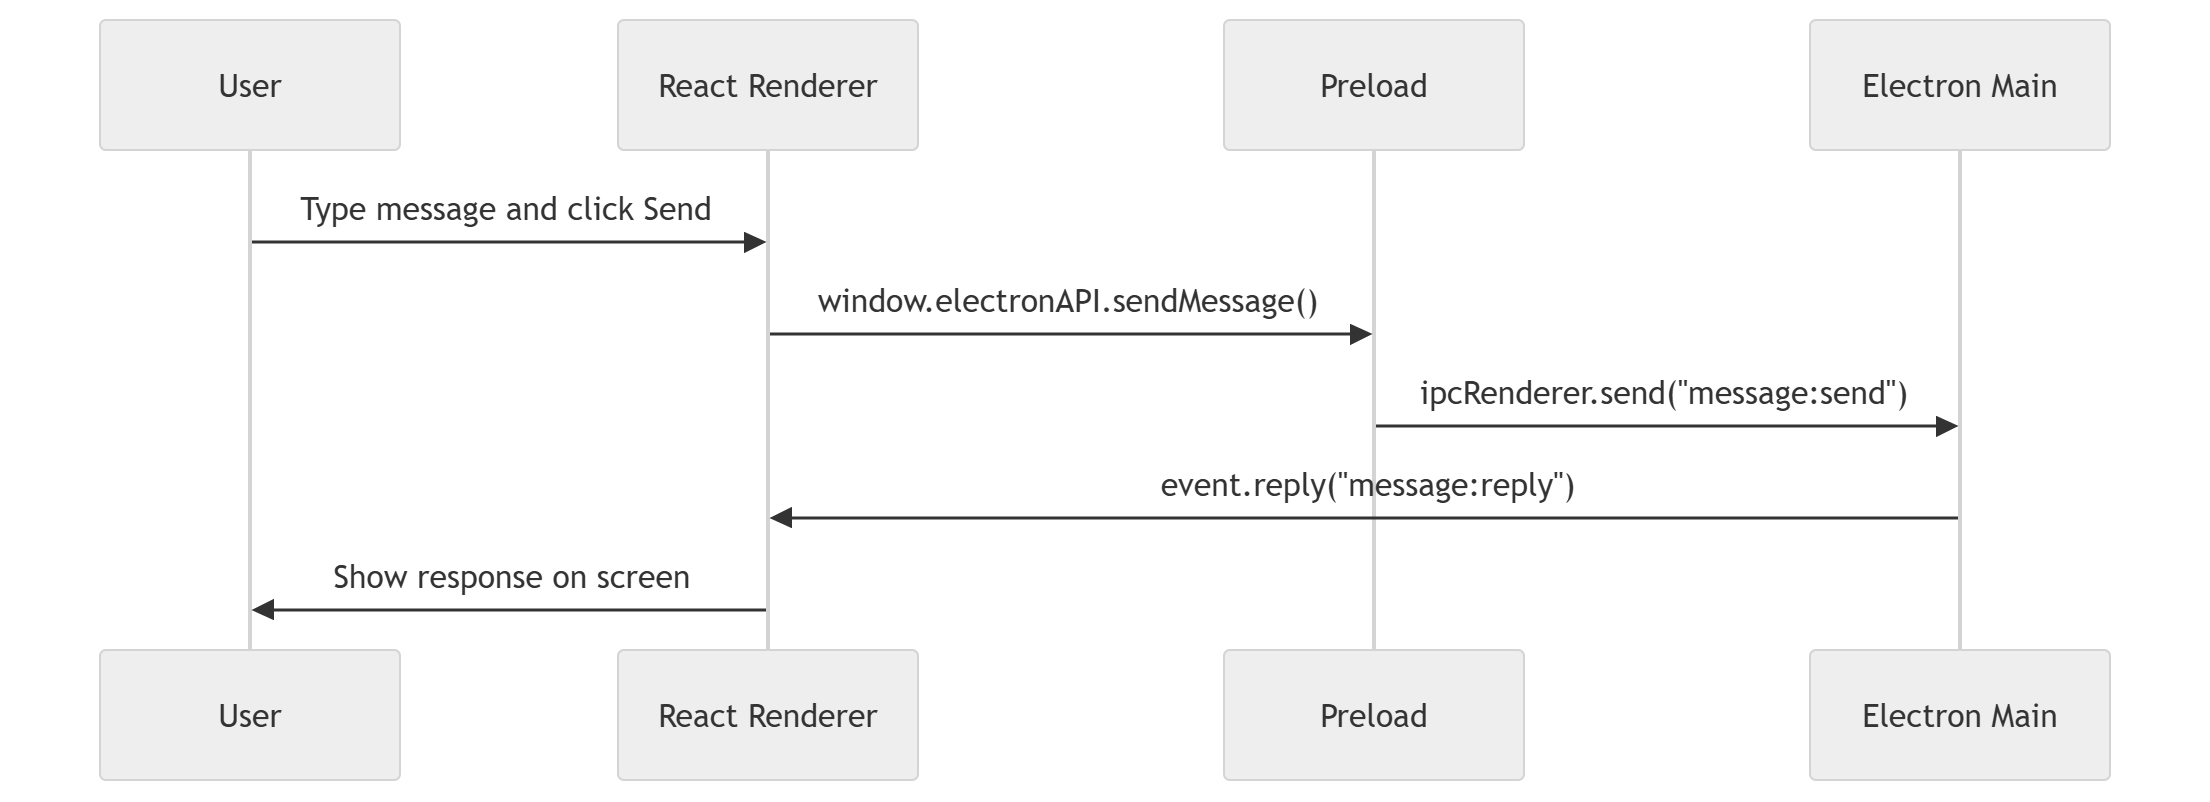
sequenceDiagram
    participant U as User
    participant R as React Renderer
    participant P as Preload
    participant M as Electron Main

    U->>R: Type message and click Send
    R->>P: window.electronAPI.sendMessage()
    P->>M: ipcRenderer.send("message:send")
    M->>R: event.reply("message:reply")
    R->>U: Show response on screen
That diagram captures the message route in a way that sticks better than a paragraph alone.
How to think about safety
Electron apps can be powerful, so it is important to keep the renderer and main process separated. Electron’s tutorials and API docs emphasize lifecycle order and proper use of the main process. The preload pattern exists to help you expose only the APIs you actually need.
For a beginner, the safe default is:
contextIsolation: truenodeIntegration: falseexpose only a small API through preload
avoid giving the renderer unrestricted access to Node.js
That does not make an app perfect by itself, but it is a solid habit from day one.
How to run the app
Once the setup is done, the common Forge development command is:
npm startThat is the command the Forge docs show after initializing the template.
If you hit problems, make sure:
dependencies installed correctly
webpack.rules.jsincludes the React loaderrenderer.jsis loading the React rootthe HTML file contains
<div id="root"></div>the main window points to the right file
These checks solve most beginner setup issues.
When you should use Vite instead
Electron Forge also offers a Vite template with the command:
npx create-electron-app@latest my-new-app --template=viteBut the docs say that as of Electron Forge v7.5.0, Vite support is experimental and future minor releases may contain breaking changes. (electronforge.io)
So how should you decide?
For a beginner article and a straightforward learning project, I would stay with Webpack because the official React integration guide is written for it and specifically tested with React 18, Babel 7, and Webpack 5.
For an advanced team that is already comfortable with Vite and wants faster iteration, the Vite template may still be attractive, but it is not the route I would choose for the cleanest first setup right now. That conclusion is an inference based on the official docs’ stable React guide and the experimental label on the Vite template.
What if you already have an Electron project?
If you already built an Electron app and want to bring it into Electron Forge, the official docs say you can use the Forge import command. The docs provide this flow: install @electron-forge/cli, then run npm exec --package=@electron-forge/cli -c "electron-forge import".
That can save time when you have an older project and want the benefit of Forge’s packaging pipeline. The docs also say Forge’s import workflow may migrate settings automatically, though some manual changes may still be necessary.
A beginner-friendly learning path
When people first learn Electron + React, they often jump straight to advanced features like auto-updating, native modules, or file system access. That is too much too soon.
A better learning path is:
run the app
render a React component
style the UI
add a button
send a message with IPC
receive a response in React
package the app
only then add advanced features
That order keeps the experience human. You gain one win at a time instead of drowning in setup complexity.
A small full example
Here is a compact end-to-end example that combines the ideas above.
src/main.js
const { app, BrowserWindow, ipcMain } = require('electron');
const path = require('path');

function createWindow() {
  const win = new BrowserWindow({
    width: 1000,
    height: 700,
    webPreferences: {
      preload: path.join(__dirname, 'preload.js'),
      contextIsolation: true,
      nodeIntegration: false,
    },
  });

  win.loadFile(path.join(__dirname, 'index.html'));
}

ipcMain.on('say-hello', (event, name) => {
  const safeName = name && name.trim() ? name.trim() : 'friend';
  event.reply('say-hello-response', `Hello, ${safeName}!`);
});

app.whenReady().then(createWindow);

app.on('window-all-closed', () => {
  if (process.platform !== 'darwin') app.quit();
});
src/preload.js
const { contextBridge, ipcRenderer } = require('electron');

contextBridge.exposeInMainWorld('electronAPI', {
  sayHello: (name) => ipcRenderer.send('say-hello', name),
  onHelloResponse: (callback) =>
    ipcRenderer.on('say-hello-response', (_, message) => callback(message)),
});
src/App.jsx
import React, { useEffect, useState } from 'react';

export default function App() {
  const [name, setName] = useState('');
  const [reply, setReply] = useState('Waiting for your name...');

  useEffect(() => {
    window.electronAPI.onHelloResponse((message) => {
      setReply(message);
    });
  }, []);

  return (
    <main className="app-shell">
      <section className="card">
        <h1>Electron React Starter</h1>
        <p>{reply}</p>

        <div className="field">
          <label htmlFor="name">Name</label>
          <input
            id="name"
            value={name}
            onChange={(e) => setName(e.target.value)}
            placeholder="Type your name"
          />
        </div>

        <button onClick={() => window.electronAPI.sayHello(name)}>
          Say hello from Electron
        </button>
      </section>
    </main>
  );
}
src/renderer.js
import * as React from 'react';
import { createRoot } from 'react-dom/client';
import App from './App.jsx';
import './index.css';

createRoot(document.getElementById('root')).render(<App />);
src/index.html
<!DOCTYPE html>
<html lang="en">
  <head>
    <meta charset="UTF-8" />
    <meta name="viewport" content="width=device-width, initial-scale=1.0" />
    <title>Electron React Starter</title>
  </head>
  <body>
    <div id="root"></div>
  </body>
</html>
This is enough to make the app feel real. The button works, the UI updates, and the bridge between React and Electron is visible.
A schema for the file roles

flowchart TB
    A[main.js] --> B[Creates Electron window]
    C[preload.js] --> D[Exposes safe bridge]
    E[renderer.js] --> F[Mounts React]
    G[App.jsx] --> H[Shows UI]
    I[index.css] --> H
This map helps beginners remember where each piece belongs.
Common mistakes beginners make
A lot of first-time Electron + React setup problems come from small details.
Forgetting the root element
If index.html does not contain a root element, React has nowhere to mount.
Missing Babel loader rules
If JSX is not being transformed, the app will fail to build.
Mixing main-process code into React components
The main process and renderer are separate worlds.
Exposing too much in preload
Keep the bridge small and intentional.
Ignoring the Forge scripts
Use the scripts Forge gives you instead of inventing a custom workflow too early.
These are beginner mistakes, but even experienced developers make them when they are moving fast.
How this feels in real life
Imagine three people building the same app.
Amina is the designer. She changes spacing and colors in React.
Youssef is the backend-minded developer. He adds IPC handlers in the main process.
Sara is the product owner. She tests the desktop app on Windows and macOS.
Electron + React works well in this kind of human workflow because everyone can focus on the layer they understand best:
design in React
desktop behavior in Electron
collaboration in the Git repository
packaging in Electron Forge
That is why this stack is popular. It fits the way teams actually work.
If you want to package the app later
Electron Forge’s docs say its build pipeline can produce installers and packaged outputs via electron-forge make, and its configuration supports packaging, makers, publishers, and hooks.
That means your learning does not stop at “the app runs on my machine.” You can move toward distributable desktop software with the same project.
A simple sequence is:
npm start
npm run package
npm run make
The exact packaging behavior depends on your Forge config, makers, and target platform. Forge’s docs also note that configuration can be placed in package.json or in forge.config.js. (electronforge.io)
Final advice for beginners
Do not try to learn Electron, React, Webpack, Babel, IPC, and packaging all in one sitting. That is how people get overwhelmed. Learn the stack in layers.
Start with this order:
create the Electron app
render one React component
understand main vs renderer
add a preload bridge
send one message through IPC
package the app
Once you can do those six things, the rest becomes much easier.
Electron gives you the desktop shell. React gives you the interface. Electron Forge gives you the project structure and packaging workflow. Together, they let you build real desktop applications with web skills you already know.
And that is the part many people miss: this is not just setup. It is a full path from idea to actual desktop app. A small app today becomes a portfolio piece tomorrow, and later it can become a real product that people install and use.