
How to Set Up a Flutter App

Flutter has become one of the most practical ways to build beautiful mobile apps with a single codebase. Whether you are making your first app or setting up a clean professional workflow for a bigger project, the setup phase matters a lot. A good setup saves time later, reduces confusion, and makes your code easier to maintain.
This guide walks through everything step by step: installing Flutter, configuring your machine, creating a project, understanding the folder structure, running the app, adding assets, handling packages, and preparing the foundation for a real-world app. I will also include code examples, setup diagrams, and practical advice based on the kind of problems people usually hit when starting.
1. What Flutter Actually Is
Flutter is an open-source UI toolkit from Google used to build apps for mobile, web, desktop, and even embedded devices from a single codebase.
The main idea is simple:
You write once in Dart.
Flutter renders its own UI.
Your app can target Android, iOS, web, Windows, macOS, and Linux.
That means instead of maintaining separate codebases for Android and iPhone, you can often build one app and ship it everywhere.
Why developers like Flutter
Flutter is popular because:
It is fast to develop with hot reload.
The UI is flexible and highly customizable.
It has strong community support.
It is suitable for both small apps and large production systems.
It works well when you want consistent design across platforms.
A simple mental model
Think of Flutter as a toolbox for building screens, buttons, forms, lists, animations, and app logic in a structured way.
2. What You Need Before You Start
Before setting up a Flutter app, make sure you have the right tools installed.
Required basics
A computer running Windows, macOS, or Linux
Internet connection
At least 10–15 GB of free disk space
An editor such as VS Code or Android Studio
A device or emulator for testing
Recommended setup
VS Code for fast editing
Android Studio for Android SDK and emulator management
Git for version control
A terminal you are comfortable with
3. Flutter App Setup Flow
Here is the full setup flow in a simple diagram.
flowchart TD
    A[Install Flutter SDK] --> B[Add Flutter to PATH]
    B --> C[Run flutter doctor]
    C --> D[Install Android Studio / VS Code]
    D --> E[Set up Android SDK and Emulator]
    E --> F[Create project with flutter create]
    F --> G[Run app on device/emulator]
    G --> H[Add dependencies, assets, and structure]
This is the path most developers follow. Once this pipeline works, the rest becomes much easier.
4. Installing Flutter
Flutter installation is different depending on your operating system.
On Windows
Download the Flutter SDK from the official Flutter website and extract it to a clean location such as:
C:\src\flutterAvoid placing Flutter inside folders with restricted access like Program Files.
Add Flutter to PATH
You need to add Flutter’s bin directory to your system PATH.
Example path:
C:\src\flutter\binAfter that, open a new terminal and test:
flutter --versionIf it prints the Flutter version, the installation is recognized.
On macOS
Extract the SDK somewhere practical, for example:
~/development/flutter
Then add Flutter to your shell path.
For zsh, add this to your ~/.zshrc:
export PATH="$PATH:$HOME/development/flutter/bin"
Then reload:
source ~/.zshrc
Test with:
flutter --version
On Linux
Extract Flutter to a location like:
~/development/flutter
Then add it to your PATH in ~/.bashrc, ~/.zshrc, or whichever shell you use:
export PATH="$PATH:$HOME/development/flutter/bin"
Reload the shell:
source ~/.bashrc
Then verify:
flutter --version
5. Running Flutter Doctor
Once Flutter is installed, run:
flutter doctor
This command checks your environment and points out missing requirements.
A healthy output means Flutter can find:
Flutter SDK
Dart SDK
Android toolchain
Connected devices or emulators
IDE plugins
Typical output concept
[✓] Flutter
[✓] Android toolchain
[✓] Chrome
[!] Android Studio
[✓] VS Code
[✓] Connected device
If something shows a warning or error, fix it before moving on.
Why this matters
Many beginners skip this step and then face random build failures later. flutter doctor is your early warning system.
6. Installing Android Studio and SDK Components
Even if you prefer VS Code, Android Studio is very helpful because it gives you:
Android SDK
SDK Manager
Android Emulator
Device Manager
Android build tools
What to install
Inside Android Studio, make sure you have:
Android SDK Platform
Android SDK Build-Tools
Android Emulator
Android Platform-Tools
Optional but useful
Android Virtual Device (AVD)
Emulator acceleration support for your machine
7. Installing VS Code
VS Code is a lightweight editor that works beautifully with Flutter.
Install these extensions:
Flutter
Dart
These give you:
Syntax highlighting
IntelliSense
Quick fixes
Run and debug buttons
Hot reload support
If you are new, VS Code often feels simpler than Android Studio for daily coding.
8. Creating Your First Flutter App
Once the setup is ready, create a new project.
flutter create my_first_app
Then move into the project folder:
cd my_first_app
Open it in your editor.
For VS Code:
code .
For Android Studio, open the folder manually.
9. Understanding the Flutter Project Structure
Flutter creates a standard structure for every new project.
Here is the basic layout:
my_first_app/
├─ android/
├─ ios/
├─ lib/
│  └─ main.dart
├─ test/
├─ web/
├─ windows/
├─ macos/
├─ linux/
├─ pubspec.yaml
├─ analysis_options.yaml
└─ README.md
What each folder means
lib/
This is where your Dart app code lives. Most of your work will happen here.
main.dart
This is the entry point of your Flutter app.
android/ and ios/
These contain native platform configuration.
web/, windows/, macos/, linux/
These are platform-specific folders for additional targets.
pubspec.yaml
This file controls dependencies, assets, fonts, and app metadata.
test/
This is for automated tests.
10. Your First main.dart
Flutter starts from main.dart. A default app usually looks something like this:
import 'package:flutter/material.dart';

void main() {
  runApp(const MyApp());
}

class MyApp extends StatelessWidget {
  const MyApp({super.key});

  @override
  Widget build(BuildContext context) {
    return MaterialApp(
      debugShowCheckedModeBanner: false,
      title: 'My First App',
      theme: ThemeData(
        colorScheme: ColorScheme.fromSeed(seedColor: Colors.blue),
        useMaterial3: true,
      ),
      home: const HomePage(),
    );
  }
}

class HomePage extends StatelessWidget {
  const HomePage({super.key});

  @override
  Widget build(BuildContext context) {
    return Scaffold(
      appBar: AppBar(
        title: const Text('Flutter Setup'),
      ),
      body: const Center(
        child: Text(
          'Hello Flutter!',
          style: TextStyle(fontSize: 24),
        ),
      ),
    );
  }
}
What this code does
main()starts the app.runApp()attaches the widget tree.MaterialAppsets up the app shell.Scaffoldgives a standard screen layout.CenterandTextshow content.
This tiny example is your first proof that everything works.
11. Running the App
After creating the project, run:
flutter run
If you have an emulator open or a device connected, Flutter will launch the app.
Useful commands
flutter devices
flutter emulators
flutter run
If you want to run on web:
flutter run -d chrome
If you want a specific device:
flutter run -d <device_id>
12. Emulator Setup
An emulator is useful if you do not have a physical device nearby.
On Android Studio
Open the Device Manager and create a virtual device.
Choose:
Device type
Android version
System image
Then start the emulator and run the app.
Common emulator issues
Sometimes the emulator starts very slowly or fails to boot.
The usual causes are:
Hardware acceleration disabled
Missing SDK components
Not enough RAM
Virtualization turned off in BIOS
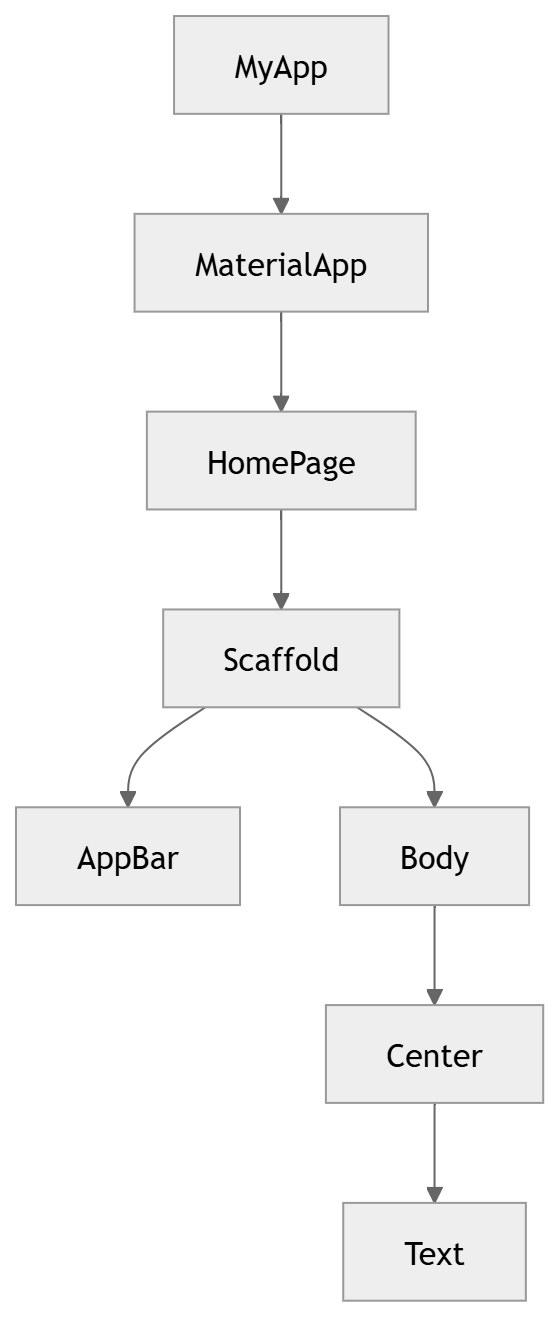
13. Basic Flutter Architecture
Flutter uses a widget tree. Everything is a widget.
That includes:
The whole app
Layout containers
Text
Buttons
Images
Spacing
Navigation elements
Widget tree concept
graph TD
    A[MyApp] --> B[MaterialApp]
    B --> C[HomePage]
    C --> D[Scaffold]
    D --> E[AppBar]
    D --> F[Body]
    F --> G[Center]
    G --> H[Text]
This structure is why Flutter feels consistent. You build UI by composing small pieces into larger ones.
14. StatelessWidget vs StatefulWidget
This is one of the first major concepts every Flutter developer learns.
StatelessWidget
Use it when the UI does not change by itself.
Example:
class WelcomeText extends StatelessWidget {
  const WelcomeText({super.key});

  @override
  Widget build(BuildContext context) {
    return const Text('Welcome back!');
  }
}
StatefulWidget
Use it when the UI changes based on internal state.
Example:
import 'package:flutter/material.dart';

class CounterPage extends StatefulWidget {
  const CounterPage({super.key});

  @override
  State<CounterPage> createState() => _CounterPageState();
}

class _CounterPageState extends State<CounterPage> {
  int count = 0;

  void increment() {
    setState(() {
      count++;
    });
  }

  @override
  Widget build(BuildContext context) {
    return Scaffold(
      appBar: AppBar(title: const Text('Counter')),
      body: Center(
        child: Text(
          'Count: $count',
          style: const TextStyle(fontSize: 28),
        ),
      ),
      floatingActionButton: FloatingActionButton(
        onPressed: increment,
        child: const Icon(Icons.add),
      ),
    );
  }
}
The difference in one line
Stateless = fixed UI
Stateful = UI can change
15. Adding Packages with pubspec.yaml
Flutter uses packages from pub.dev and local assets declared in pubspec.yaml.
Example:
name: my_first_app
description: A simple Flutter project
publish_to: 'none'
version: 1.0.0+1

environment:
  sdk: ^3.0.0

dependencies:
  flutter:
    sdk: flutter
  cupertino_icons: ^1.0.8
  http: ^1.2.2
  provider: ^6.1.2

dev_dependencies:
  flutter_test:
    sdk: flutter
  flutter_lints: ^5.0.0

flutter:
  uses-material-design: true
After editing pubspec.yaml
Run:
flutter pub get
This downloads and links the packages.
16. Adding Assets like Images and Fonts
Assets are important for real apps.
Example folder structure
assets/
├─ images/
│  ├─ logo.png
│  └─ banner.jpg
├─ icons/
└─ fonts/
Declare assets in pubspec.yaml
flutter:
  uses-material-design: true

  assets:
    - assets/images/
    - assets/icons/
Use an image in a widget
Image.asset(
  'assets/images/logo.png',
  width: 120,
  height: 120,
)
Font example
flutter:
  fonts:
    - family: Poppins
      fonts:
        - asset: assets/fonts/Poppins-Regular.ttf
        - asset: assets/fonts/Poppins-Bold.ttf
          weight: 700
Then use it in code:
Text(
  'Hello Flutter',
  style: TextStyle(
    fontFamily: 'Poppins',
    fontSize: 20,
  ),
)
17. A Clean Folder Structure for Real Apps
A proper setup becomes much more valuable when your app grows.
A simple structure can look like this:
lib/
├─ main.dart
├─ app/
│  ├─ app.dart
│  └─ router.dart
├─ features/
│  ├─ auth/
│  │  ├─ login_page.dart
│  │  └─ register_page.dart
│  ├─ home/
│  │  └─ home_page.dart
│  └─ profile/
│     └─ profile_page.dart
├─ shared/
│  ├─ widgets/
│  ├─ theme/
│  └─ utils/
└─ services/
   ├─ api_service.dart
   └─ storage_service.dart
Why this is better
Instead of putting everything in one file, you separate by feature and responsibility. That makes maintenance easier.
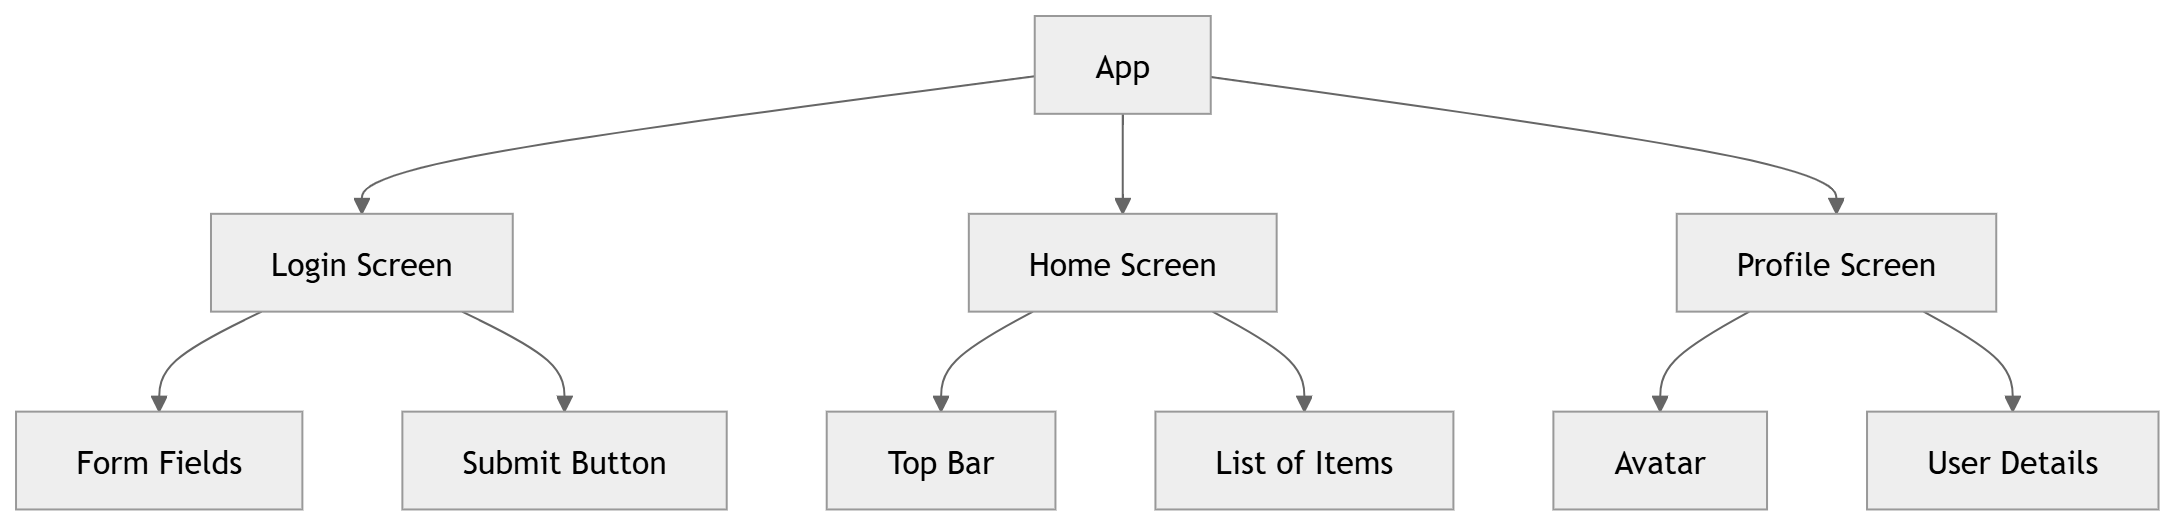
18. Example App Layout Structure
Here is a simple screen layout schema for a Flutter app.
graph TD
    A[App] --> B[Login Screen]
    A --> C[Home Screen]
    A --> D[Profile Screen]
    B --> E[Form Fields]
    B --> F[Submit Button]
    C --> G[Top Bar]
    C --> H[List of Items]
    D --> I[Avatar]
    D --> J[User Details]
This helps you think in terms of screens and components before writing code.
19. Building a Simple Home Screen
Here is a more realistic first screen.
import 'package:flutter/material.dart';

class HomePage extends StatelessWidget {
  const HomePage({super.key});

  @override
  Widget build(BuildContext context) {
    return Scaffold(
      appBar: AppBar(
        title: const Text('Home'),
        actions: [
          IconButton(
            onPressed: () {},
            icon: const Icon(Icons.notifications),
          ),
        ],
      ),
      body: Padding(
        padding: const EdgeInsets.all(16),
        child: Column(
          crossAxisAlignment: CrossAxisAlignment.start,
          children: [
            const Text(
              'Welcome to Flutter',
              style: TextStyle(fontSize: 28, fontWeight: FontWeight.bold),
            ),
            const SizedBox(height: 12),
            const Text(
              'This is your starter screen with a clean layout.',
              style: TextStyle(fontSize: 16),
            ),
            const SizedBox(height: 24),
            ElevatedButton(
              onPressed: () {},
              child: const Text('Get Started'),
            ),
          ],
        ),
      ),
    );
  }
}
This gives you a foundation for more polished UIs.
20. Navigation Between Screens
Real apps have multiple screens.
Basic navigation example
Home screen
import 'package:flutter/material.dart';
import 'details_page.dart';

class HomePage extends StatelessWidget {
  const HomePage({super.key});

  @override
  Widget build(BuildContext context) {
    return Scaffold(
      appBar: AppBar(title: const Text('Home')),
      body: Center(
        child: ElevatedButton(
          onPressed: () {
            Navigator.push(
              context,
              MaterialPageRoute(
                builder: (context) => const DetailsPage(),
              ),
            );
          },
          child: const Text('Go to Details'),
        ),
      ),
    );
  }
}
Details screen
import 'package:flutter/material.dart';

class DetailsPage extends StatelessWidget {
  const DetailsPage({super.key});

  @override
  Widget build(BuildContext context) {
    return Scaffold(
      appBar: AppBar(title: const Text('Details')),
      body: const Center(
        child: Text('This is the details screen'),
      ),
    );
  }
}
Navigation flow diagram

sequenceDiagram
    participant U as User
    participant H as HomePage
    participant D as DetailsPage

    U->>H: Tap "Go to Details"
    H->>D: Navigator.push()
    D-->>U: Details screen shown
21. Forms and Input Fields
Most apps need forms at some point.
Example login form
import 'package:flutter/material.dart';

class LoginPage extends StatefulWidget {
  const LoginPage({super.key});

  @override
  State<LoginPage> createState() => _LoginPageState();
}

class _LoginPageState extends State<LoginPage> {
  final _formKey = GlobalKey<FormState>();
  final _emailController = TextEditingController();
  final _passwordController = TextEditingController();

  @override
  void dispose() {
    _emailController.dispose();
    _passwordController.dispose();
    super.dispose();
  }

  void _submit() {
    if (_formKey.currentState!.validate()) {
      final email = _emailController.text.trim();
      final password = _passwordController.text.trim();

      debugPrint('Email: $email');
      debugPrint('Password: $password');
    }
  }

  @override
  Widget build(BuildContext context) {
    return Scaffold(
      appBar: AppBar(title: const Text('Login')),
      body: Padding(
        padding: const EdgeInsets.all(16),
        child: Form(
          key: _formKey,
          child: Column(
            children: [
              TextFormField(
                controller: _emailController,
                keyboardType: TextInputType.emailAddress,
                decoration: const InputDecoration(
                  labelText: 'Email',
                  border: OutlineInputBorder(),
                ),
                validator: (value) {
                  if (value == null || value.isEmpty) {
                    return 'Email is required';
                  }
                  if (!value.contains('@')) {
                    return 'Enter a valid email';
                  }
                  return null;
                },
              ),
              const SizedBox(height: 16),
              TextFormField(
                controller: _passwordController,
                obscureText: true,
                decoration: const InputDecoration(
                  labelText: 'Password',
                  border: OutlineInputBorder(),
                ),
                validator: (value) {
                  if (value == null || value.isEmpty) {
                    return 'Password is required';
                  }
                  if (value.length < 6) {
                    return 'Password must be at least 6 characters';
                  }
                  return null;
                },
              ),
              const SizedBox(height: 20),
              ElevatedButton(
                onPressed: _submit,
                child: const Text('Login'),
              ),
            ],
          ),
        ),
      ),
    );
  }
}
Why this matters
Forms are where validation, user experience, and state handling start becoming important.
22. Responsive Layout Basics
Flutter apps should work across many screen sizes.
Use layout widgets wisely
RowColumnExpandedFlexibleWrapListViewGridViewMediaQuery
Responsive example
import 'package:flutter/material.dart';

class ResponsiveHome extends StatelessWidget {
  const ResponsiveHome({super.key});

  @override
  Widget build(BuildContext context) {
    final width = MediaQuery.of(context).size.width;

    return Scaffold(
      appBar: AppBar(title: const Text('Responsive UI')),
      body: Padding(
        padding: const EdgeInsets.all(16),
        child: width > 600
            ? Row(
                children: const [
                  Expanded(child: Placeholder()),
                  SizedBox(width: 16),
                  Expanded(child: Placeholder()),
                ],
              )
            : Column(
                children: const [
                  Expanded(child: Placeholder()),
                  SizedBox(height: 16),
                  Expanded(child: Placeholder()),
                ],
              ),
      ),
    );
  }
}
Simple responsive idea
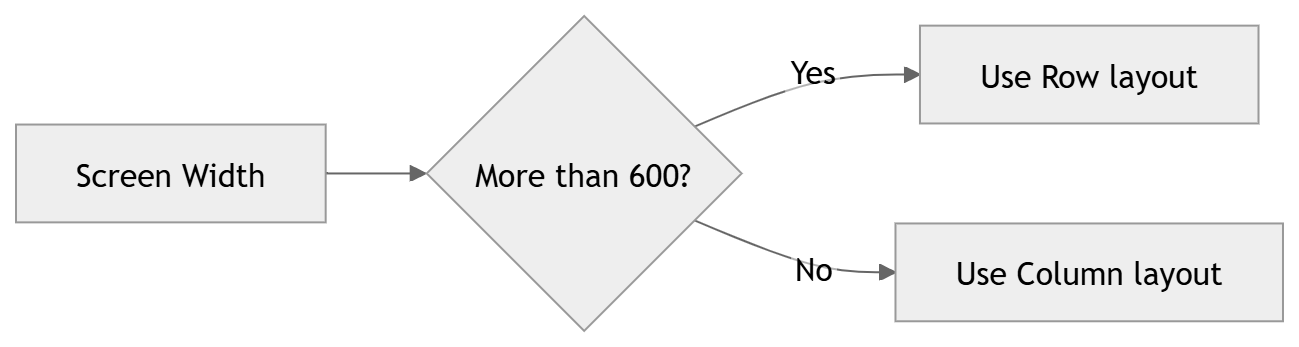
flowchart LR
    A[Screen Width] --> B{More than 600?}
    B -- Yes --> C[Use Row layout]
    B -- No --> D[Use Column layout]
23. Making Your App Look Better with Theme
A good setup includes a theme from the beginning.
Example theme
import 'package:flutter/material.dart';

class MyApp extends StatelessWidget {
  const MyApp({super.key});

  @override
  Widget build(BuildContext context) {
    return MaterialApp(
      title: 'Styled App',
      debugShowCheckedModeBanner: false,
      theme: ThemeData(
        useMaterial3: true,
        colorScheme: ColorScheme.fromSeed(
          seedColor: Colors.deepPurple,
        ),
        appBarTheme: const AppBarTheme(
          centerTitle: true,
        ),
        textTheme: const TextTheme(
          bodyMedium: TextStyle(fontSize: 16),
        ),
      ),
      home: const HomePage(),
    );
  }
}
Why theme early
If you wait until the app is large, refactoring colors and typography becomes messy. Start structured.
24. Working with HTTP API Calls
Many Flutter apps talk to a backend.
Add the package
In pubspec.yaml:
dependencies:
  http: ^1.2.2
Then:
flutter pub get
Example API request
import 'dart:convert';
import 'package:http/http.dart' as http;

Future<List<dynamic>> fetchPosts() async {
  final response = await http.get(
    Uri.parse('https://jsonplaceholder.typicode.com/posts'),
  );

  if (response.statusCode == 200) {
    return jsonDecode(response.body);
  } else {
    throw Exception('Failed to load posts');
  }
}
Displaying data in a widget
import 'package:flutter/material.dart';

class PostsPage extends StatelessWidget {
  const PostsPage({super.key});

  Future<List<dynamic>> fetchPosts() async {
    final response = await http.get(
      Uri.parse('https://jsonplaceholder.typicode.com/posts'),
    );

    if (response.statusCode == 200) {
      return jsonDecode(response.body);
    } else {
      throw Exception('Failed to load posts');
    }
  }

  @override
  Widget build(BuildContext context) {
    return Scaffold(
      appBar: AppBar(title: const Text('Posts')),
      body: FutureBuilder<List<dynamic>>(
        future: fetchPosts(),
        builder: (context, snapshot) {
          if (snapshot.connectionState == ConnectionState.waiting) {
            return const Center(child: CircularProgressIndicator());
          }

          if (snapshot.hasError) {
            return Center(child: Text('Error: ${snapshot.error}'));
          }

          final posts = snapshot.data ?? [];

          return ListView.builder(
            itemCount: posts.length,
            itemBuilder: (context, index) {
              final post = posts[index];
              return ListTile(
                title: Text(post['title']),
                subtitle: Text(post['body']),
              );
            },
          );
        },
      ),
    );
  }
}
25. State Management Setup
As soon as your app grows, you need a better way to manage data.
A simple provider example
Add to pubspec.yaml:
dependencies:
  provider: ^6.1.2
Counter model
import 'package:flutter/foundation.dart';

class CounterProvider extends ChangeNotifier {
  int _count = 0;

  int get count => _count;

  void increment() {
    _count++;
    notifyListeners();
  }
}
Wrap your app
import 'package:flutter/material.dart';
import 'package:provider/provider.dart';

void main() {
  runApp(
    ChangeNotifierProvider(
      create: (_) => CounterProvider(),
      child: const MyApp(),
    ),
  );
}
Use the state
import 'package:flutter/material.dart';
import 'package:provider/provider.dart';

class CounterPage extends StatelessWidget {
  const CounterPage({super.key});

  @override
  Widget build(BuildContext context) {
    final counter = context.watch<CounterProvider>();

    return Scaffold(
      appBar: AppBar(title: const Text('Counter')),
      body: Center(
        child: Text(
          '${counter.count}',
          style: const TextStyle(fontSize: 40),
        ),
      ),
      floatingActionButton: FloatingActionButton(
        onPressed: () => context.read<CounterProvider>().increment(),
        child: const Icon(Icons.add),
      ),
    );
  }
}
Why this matters
A strong setup separates UI from business logic early.
26. Debugging Tips When the App Does Not Run
A setup almost never works perfectly on the first try. That is normal.
Common problems
1. Flutter command not found
This usually means Flutter is not added to PATH correctly.
2. Android license issues
Run:
flutter doctor --android-licenses
3. Emulator not showing
Check Android SDK and virtualization settings.
4. Gradle build errors
Often caused by version mismatches, corrupted caches, or SDK issues.
5. Package version conflicts
Sometimes older packages are incompatible with your Flutter version.
Useful clean-up commands
flutter clean
flutter pub get
If things still feel broken, restart the IDE and emulator.
27. A Practical Setup Checklist
Before building your real app, confirm this checklist:
Flutter installed
PATH configured
flutter doctormostly cleanAndroid Studio or another IDE installed
Emulator created or device connected
New project created successfully
App runs on at least one platform
Assets declared properly
Theme configured
Basic folder structure organized
This is the kind of preparation that pays off later.
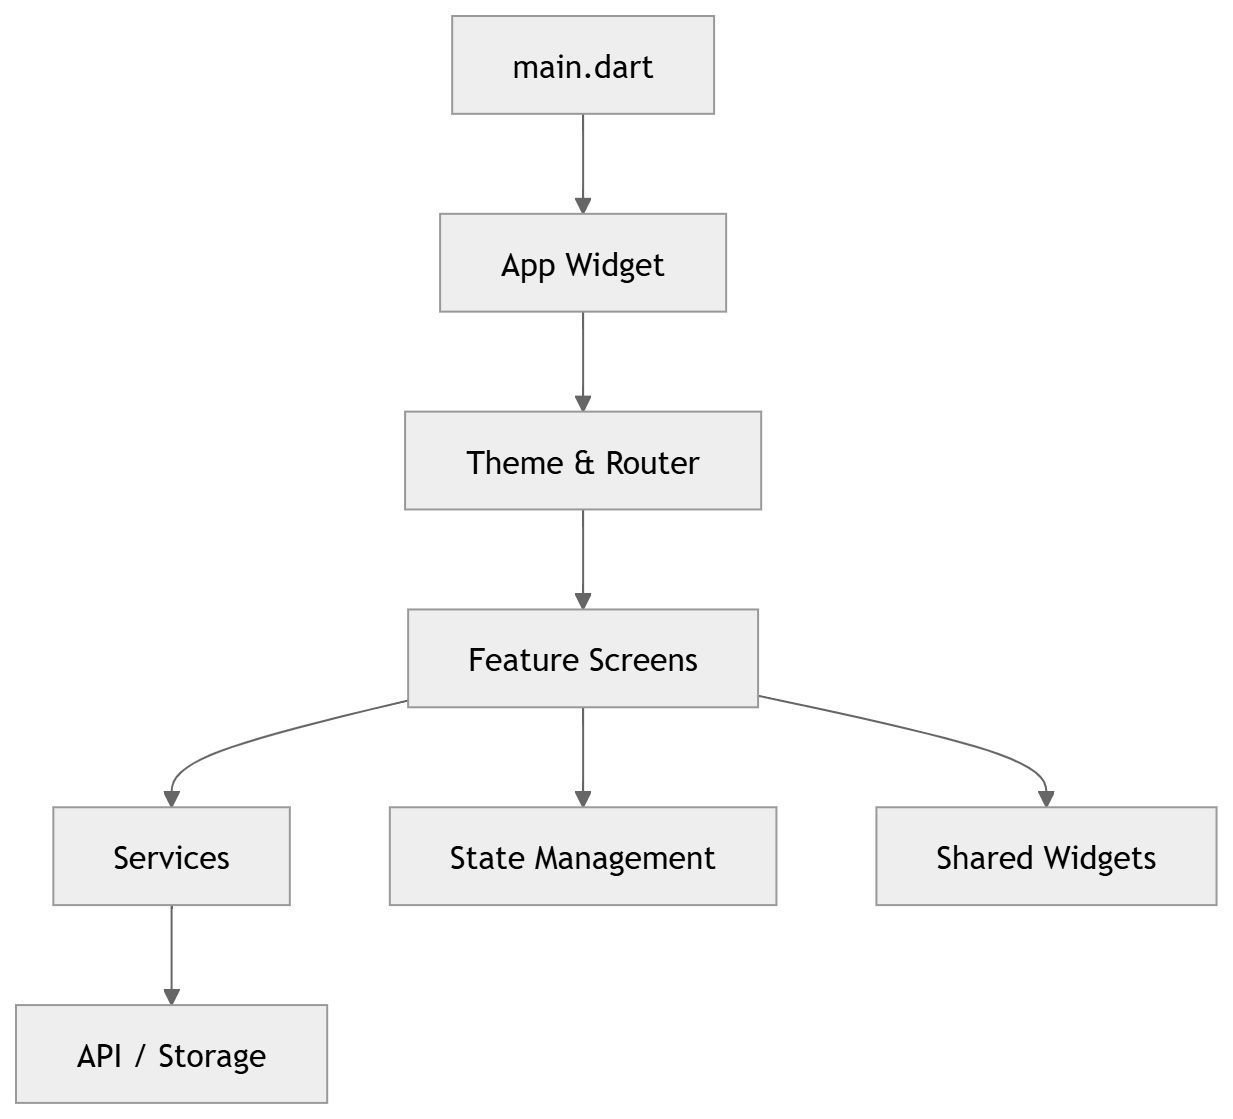
28. A Better Starter App Structure
Here is a simple architecture you can use in a real project.
flowchart TD
    A[main.dart] --> B[App Widget]
    B --> C[Theme & Router]
    C --> D[Feature Screens]
    D --> E[Services]
    D --> F[State Management]
    D --> G[Shared Widgets]
    E --> H[API / Storage]
Example file plan
main.dartstarts the appapp.dartholds MaterialApprouter.dartmanages routesservices/handles API and storagefeatures/keeps screen logicshared/widgets/stores reusable UI pieces
This is a more realistic foundation than putting everything in one file.
29. A Full Starter Example
Here is a compact but structured starter example.
main.dart
import 'package:flutter/material.dart';

void main() {
  runApp(const MyApp());
}

class MyApp extends StatelessWidget {
  const MyApp({super.key});

  @override
  Widget build(BuildContext context) {
    return MaterialApp(
      debugShowCheckedModeBanner: false,
      title: 'Starter App',
      theme: ThemeData(
        useMaterial3: true,
        colorScheme: ColorScheme.fromSeed(seedColor: Colors.teal),
      ),
      home: const HomePage(),
    );
  }
}
home_page.dart
import 'package:flutter/material.dart';
import 'details_page.dart';

class HomePage extends StatelessWidget {
  const HomePage({super.key});

  @override
  Widget build(BuildContext context) {
    return Scaffold(
      appBar: AppBar(
        title: const Text('Starter App'),
      ),
      body: Center(
        child: ElevatedButton(
          onPressed: () {
            Navigator.push(
              context,
              MaterialPageRoute(
                builder: (_) => const DetailsPage(),
              ),
            );
          },
          child: const Text('Open Details'),
        ),
      ),
    );
  }
}
details_page.dart
import 'package:flutter/material.dart';

class DetailsPage extends StatelessWidget {
  const DetailsPage({super.key});

  @override
  Widget build(BuildContext context) {
    return Scaffold(
      appBar: AppBar(title: const Text('Details')),
      body: const Center(
        child: Text('You are on the details page'),
      ),
    );
  }
}
This is simple, clean, and expandable.
30. Best Practices for Setting Up a Flutter App
A setup is not just about getting the app running. It is about making future development pleasant.
Good practices
Keep main.dart small
Move app logic into features and services.
Use meaningful names
Avoid vague names like page1.dart or temp_widget.dart.
Separate UI from logic
Widgets should focus on rendering.
Use consistent formatting
Run formatter regularly.
flutter format .
Keep dependencies under control
Do not add packages just because they are popular.
Prepare for scale early
A small amount of structure saves a lot of pain later.
31. Common Beginner Mistakes
People usually make the same mistakes when setting up their first Flutter app.
Mistake 1: Skipping flutter doctor
This causes later confusion.
Mistake 2: Keeping everything in one file
It works briefly, then becomes unmanageable.
Mistake 3: Forgetting flutter pub get
Packages will not work until dependencies are fetched.
Mistake 4: Hardcoding too much
You should avoid stuffing values all over the UI.
Mistake 5: Ignoring asset declaration
Images do not work unless declared properly.
Mistake 6: Not disposing controllers
Controllers and streams should be cleaned up when needed.
32. When Your First Setup Becomes a Real Product
Once your app is working, the real journey begins.
You may add:
authentication
local storage
API integration
push notifications
analytics
dark mode
localization
onboarding screens
offline support
A solid Flutter setup gives you room to grow into all of that without restarting from scratch.
33. Human Advice from Experience
The first Flutter setup can feel a little heavy. There are SDKs, emulators, folders, dependencies, and config files all at once. That is normal. Most people do not get it perfect on the first day.
The trick is not to understand everything immediately. The trick is to get the app running, then improve the structure step by step.
Start with:
Install Flutter
Run
flutter doctorCreate a project
Run the default app
Change the home screen
Add one package
Add one asset
Build one feature at a time
That rhythm keeps the process calm and manageable.
Flutter becomes much more enjoyable once your setup is stable. After that, it feels less like “configuration work” and more like building something real.
34. Final Setup Summary
A successful Flutter app setup includes:
Flutter SDK installed correctly
PATH configured
Android Studio or VS Code installed
Emulator or device ready
Project created with
flutter createApp running with
flutter runClean folder structure
pubspec.yamlconfiguredAssets and fonts declared correctly
Basic theme and navigation in place
Once these pieces are ready, you are in a strong position to build almost anything with Flutter.
35. Final Thoughts
Setting up a Flutter app is the first real milestone in your development workflow. It can feel technical at first, but once you understand the structure, it becomes very logical. Flutter gives you a powerful base for creating modern apps, and a good setup makes the whole journey smoother.
The best setup is not the one with the most tools. It is the one that helps you move confidently from idea to screen, from screen to feature, and from feature to finished product.
36. Extra Example: Minimal Production-Friendly Starter
Here is a compact starter file you can use as a reference.
import 'package:flutter/material.dart';

void main() {
  runApp(const StarterApp());
}

class StarterApp extends StatelessWidget {
  const StarterApp({super.key});

  @override
  Widget build(BuildContext context) {
    return MaterialApp(
      debugShowCheckedModeBanner: false,
      title: 'Starter App',
      theme: ThemeData(
        useMaterial3: true,
        colorScheme: ColorScheme.fromSeed(seedColor: Colors.indigo),
      ),
      home: const StarterHomePage(),
    );
  }
}

class StarterHomePage extends StatelessWidget {
  const StarterHomePage({super.key});

  @override
  Widget build(BuildContext context) {
    return Scaffold(
      appBar: AppBar(
        title: const Text('Flutter Starter'),
      ),
      body: Padding(
        padding: const EdgeInsets.all(24),
        child: Column(
          crossAxisAlignment: CrossAxisAlignment.start,
          children: [
            const Text(
              'Your Flutter app is ready.',
              style: TextStyle(fontSize: 28, fontWeight: FontWeight.bold),
            ),
            const SizedBox(height: 12),
            const Text(
              'Now you can add screens, logic, packages, and real features.',
              style: TextStyle(fontSize: 16),
            ),
            const Spacer(),
            SizedBox(
              width: double.infinity,
              child: ElevatedButton(
                onPressed: () {},
                child: const Text('Continue'),
              ),
            ),
          ],
        ),
      ),
    );
  }
}
That is often the best place to begin: simple, readable, and ready to grow.