
How to Create a Desktop App with Tauri

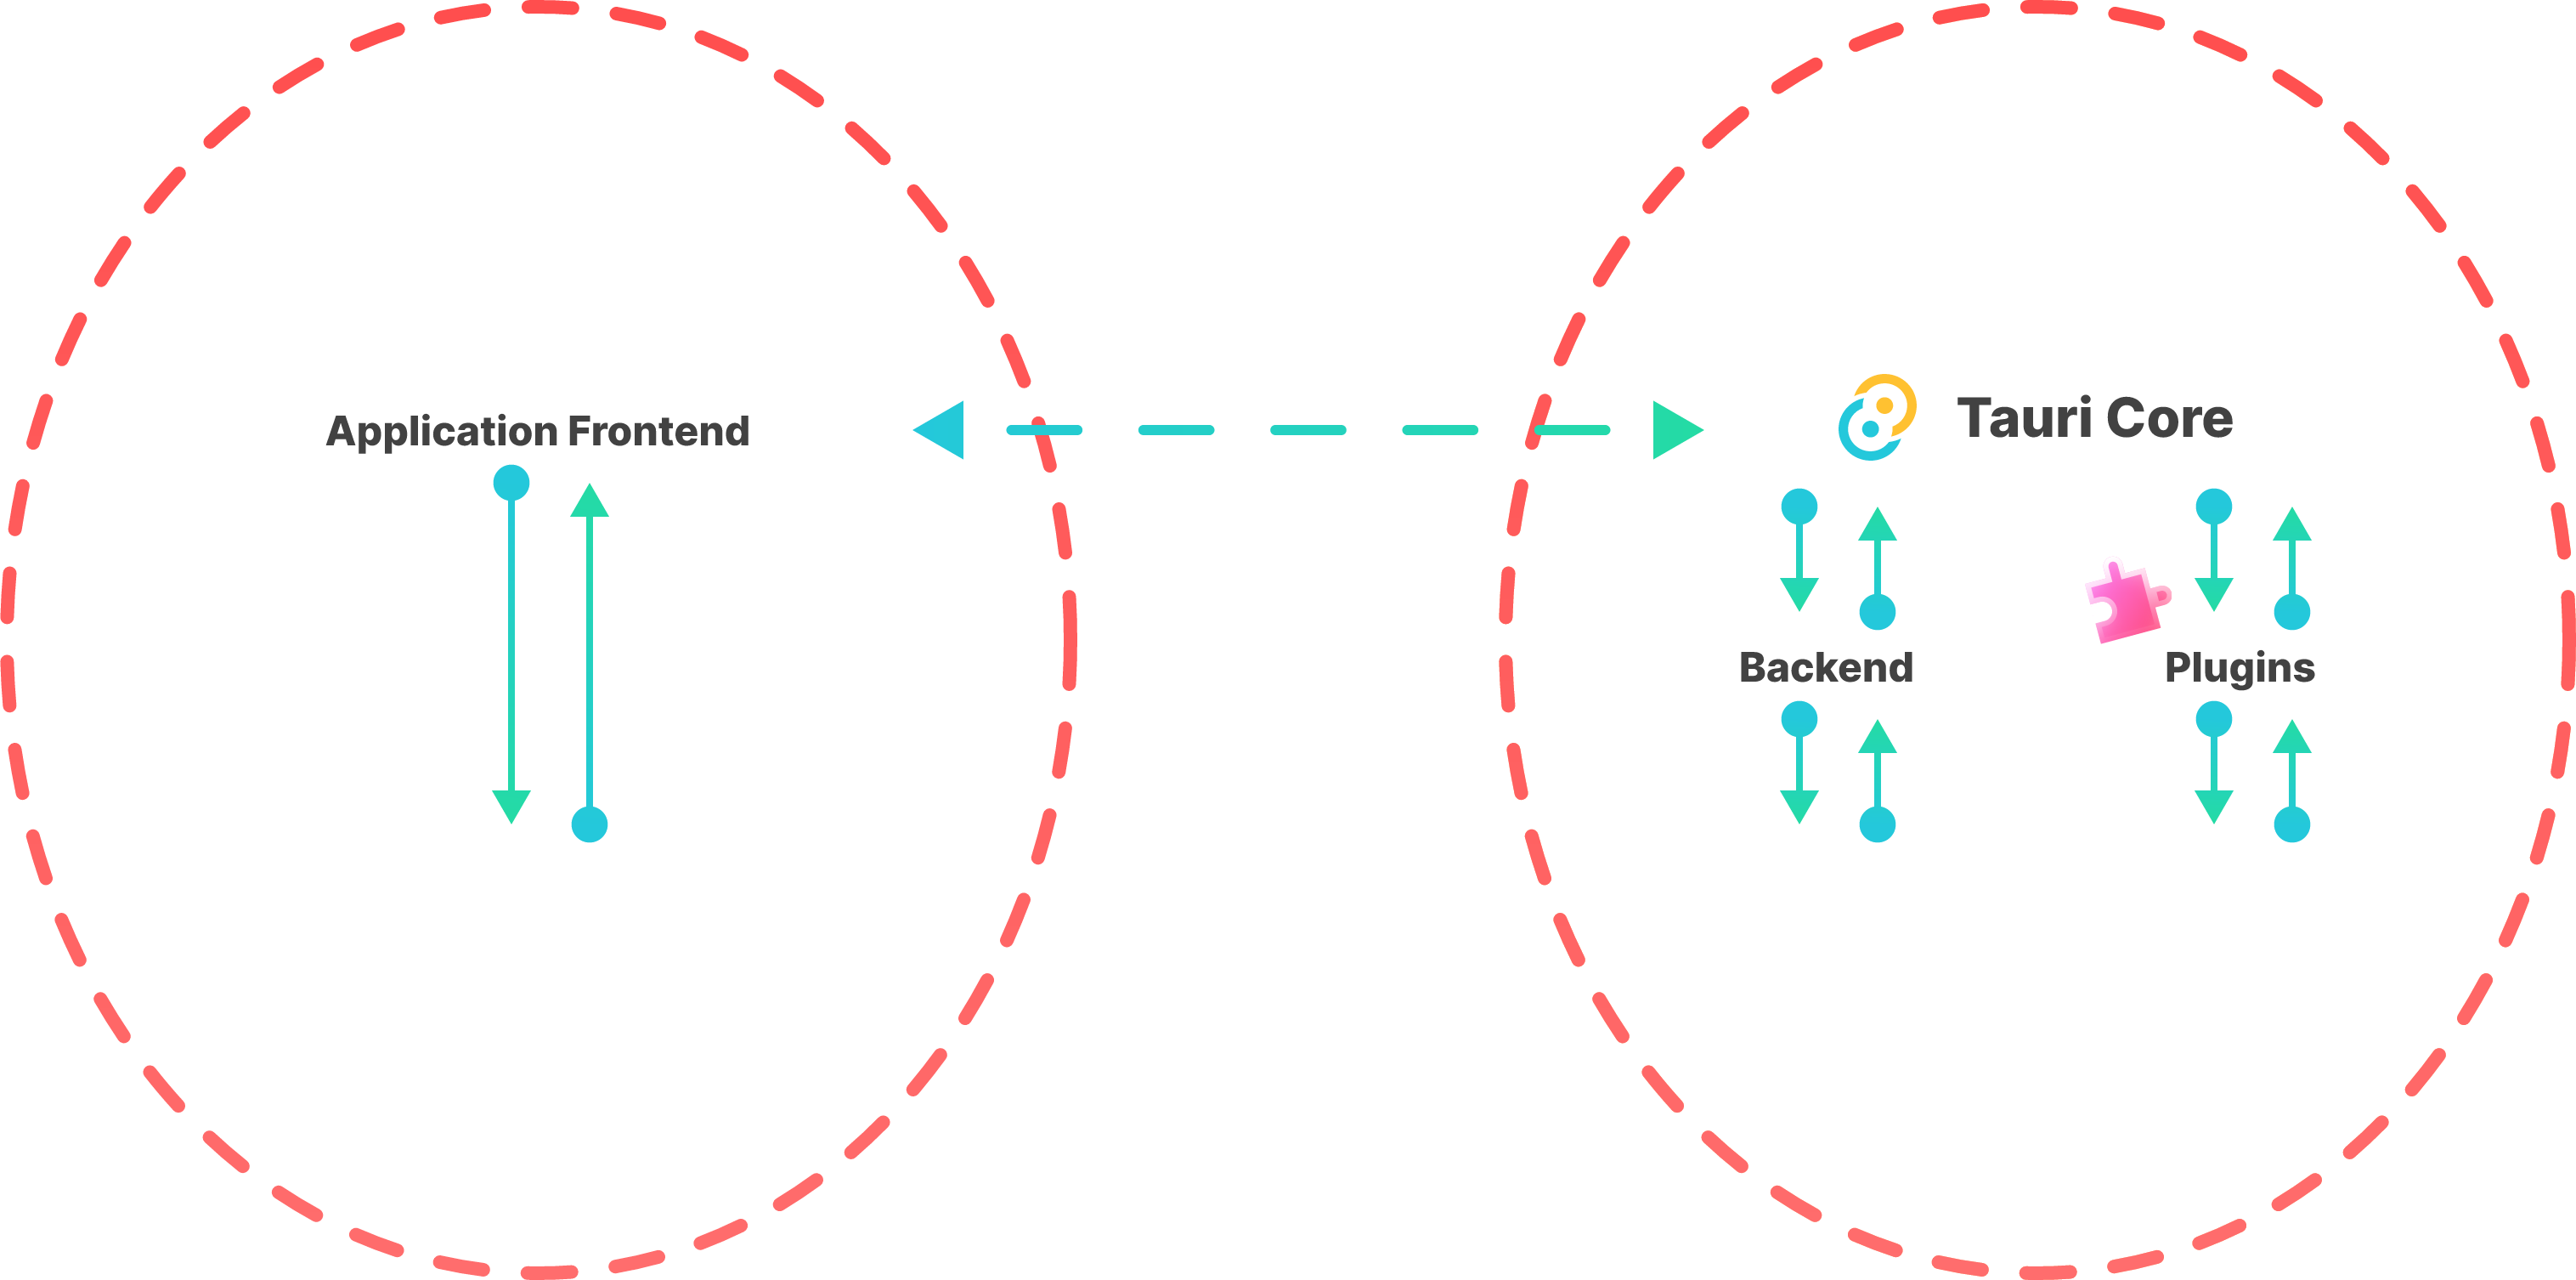
Tauri is a great fit when you want the speed and flexibility of a web UI, but you also want a smaller desktop app backed by Rust. The official docs describe Tauri as a framework for building tiny, fast binaries, using HTML, JavaScript, and CSS for the UI while relying on Rust for backend logic when needed. Tauri apps run in the operating system’s webview, and the architecture is built around message passing between the frontend and Rust side. (Tauri)
That combination is what makes Tauri feel practical: you can keep the interface familiar if you already know frontend development, while moving the heavier or more sensitive work into Rust. In other words, you are not building a website “inside a browser window”; you are building a real desktop app that happens to render its UI through a webview.
1) What you need before starting
Before creating a project, the official prerequisites are system dependencies, Rust, and Node.js for the JavaScript side when applicable. The docs list support paths for Linux, macOS, and Windows, and the exact system packages depend on your platform.
A simple mental model helps here:
Your machine
├── Rust toolchain
├── Node.js / package manager
├── OS-specific build dependencies
└── A webview engine provided by the OS
That setup may sound like a lot, but the payoff is a desktop app that stays lightweight and feels close to native because Tauri leans on the system webview rather than bundling a full browser runtime.
2) Create a new Tauri project
The easiest path is create-tauri-app, which the official docs recommend for scaffolding a new project. It supports several officially maintained templates, including vanilla HTML/CSS/JavaScript, React, Vue, Svelte, SolidJS, Angular, Preact, Yew, Leptos, and Sycamore.
You can create the project with a package manager command like this:
npm create tauri-app@latest
Or with one of the other supported entry points:
pnpm create tauri-app
yarn create tauri-app
bun create tauri-app
cargo create-tauri-app
The wizard will ask for a project name, identifier, frontend language, package manager, and framework choice. That little guided setup is one of the nicest parts of Tauri: you do not need to hand-wire everything from scratch on day one.
If you are adding Tauri to an existing app, the official CLI docs also show how to install the CLI directly into the project, for example:
npm install --save-dev @tauri-apps/cli@latest
The CLI is what you use throughout the development lifecycle.
3) Understand the project structure first
A Tauri project is usually split into two parts: a JavaScript project and a Rust project inside src-tauri/. The official structure looks roughly like this:
.
├── package.json
├── index.html
├── src/
│   └── main.js
└── src-tauri/
    ├── Cargo.toml
    ├── Cargo.lock
    ├── build.rs
    ├── tauri.conf.json
    ├── src/
    │   ├── main.rs
    │   └── lib.rs
    ├── icons/
    └── capabilities/
        └── default.json
A simple schema of the app flow looks like this:
Frontend UI
    ↓ invoke()
Tauri command
    ↓
Rust backend logic
    ↓ return value / error
Frontend updates the UI
The important files are tauri.conf.json, which stores the main app configuration, and the capabilities/ folder, which Tauri reads for command permissions. That permission layer matters because Tauri is designed around allowing only the backend capabilities you explicitly expose.
4) Your first desktop app: a tiny “greeting” example
The cleanest first example is a command that receives a name from the frontend and returns a greeting from Rust. Tauri commands can accept arguments, return values, return errors, and run asynchronously. The official docs also note that commands in src-tauri/src/lib.rs should not be marked pub.
Here is a minimal Rust command:
// src-tauri/src/lib.rs
#[tauri::command]
fn greet(name: String) -> String {
    format!("Hello, {}!", name)
}

#[cfg_attr(mobile, tauri::mobile_entry_point)]
pub fn run() {
    tauri::Builder::default()
        .invoke_handler(tauri::generate_handler![greet])
        .run(tauri::generate_context!())
        .expect("error while running tauri application");
}
Notice the two core ideas:
#[tauri::command]tells Tauri this function may be called from the frontend.tauri::generate_handler![greet]registers the command with the app builder.
5) Call Rust from the frontend
On the frontend side, the official API uses invoke from @tauri-apps/api/core. The docs show a standard pattern where you import invoke, call the command by name, and receive a promise with the result. Arguments are passed as a JSON object, and the keys should match the command parameter names in camelCase unless you use rename_all.
// src/main.js
import { invoke } from '@tauri-apps/api/core';

async function greetUser() {
  const message = await invoke('greet', { name: 'Hassan' });
  console.log(message);
}

greetUser();
That is the pattern you will use again and again in a Tauri app: the frontend stays simple, and Rust handles the logic behind the scenes. Since invoke returns a promise, it fits naturally into async/await code.
6) Build a small UI around the command
A desktop app feels much better when the interface reacts to user input instead of just printing to the console. Here is a tiny frontend example that takes a name from a text box and shows the returned greeting:
<!-- index.html -->
<!doctype html>
<html lang="en">
  <head>
    <meta charset="UTF-8" />
    <meta name="viewport" content="width=device-width, initial-scale=1.0" />
    <title>Tauri Greeting App</title>
  </head>
  <body>
    <main>
      <h1>Hello from Tauri</h1>
      <input id="name" type="text" placeholder="Enter your name" />
      <button id="btn">Greet me</button>
      <p id="output"></p>
    </main>

    <script type="module" src="/src/main.js"></script>
  </body>
</html>
// src/main.js
import { invoke } from '@tauri-apps/api/core';

const input = document.querySelector('#name');
const button = document.querySelector('#btn');
const output = document.querySelector('#output');

button.addEventListener('click', async () => {
  const name = input.value.trim();

  if (!name) {
    output.textContent = 'Please type your name first.';
    return;
  }

  try {
    const message = await invoke('greet', { name });
    output.textContent = message;
  } catch (err) {
    output.textContent = `Something went wrong: ${String(err)}`;
  }
});
This example is small on purpose. A first Tauri app should feel like a conversation between the two halves of the project: the UI asks for something, Rust answers, and the UI updates. That rhythm is the heart of Tauri development.
7) Use events when you need more than request/response
Commands are best when the frontend asks for a value and Rust returns one. Tauri also provides an event system for looser communication. The docs describe events as simpler, always async, JSON-based, and not type-safe like commands. They are useful when you need broadcasts, progress updates, or notifications between parts of the app.
A simple event flow looks like this:
Frontend sends event ──► Rust listens
Rust sends event ──────► Frontend listens
Here is a frontend example from the official API style:
import { emit } from '@tauri-apps/api/event';

emit('file-selected', '/path/to/file');
And a listener example:
import { listen } from '@tauri-apps/api/event';

const unlisten = await listen('download-started', (event) => {
  console.log(event.payload);
});

// later
unlisten();
That unlisten() step is easy to forget, but the docs explicitly recommend removing listeners when a component goes out of scope. It keeps your app cleaner and avoids accidental duplicate listeners in long-running screens.
8) Async commands for heavier work
If a task might block the UI, Tauri recommends async commands. The official docs say async commands are preferred for heavy work because they avoid freezes and slowdowns, and they run on a separate async task.
A practical example:
#[tauri::command]
async fn load_profile(user_id: String) -> Result<String, String> {
    // imagine database access or network I/O here
    Ok(format!("Loaded profile for {}", user_id))
}
On the frontend, it still looks like a normal promise:
const result = await invoke('load_profile', { userId: '42' });
The point is not just performance. Async commands also keep the app feeling polished, which matters a lot more than people expect. Users rarely praise architecture directly, but they always notice when a window stutters.
9) A small architecture schema you can keep in your head
When Tauri clicks, it is often because you stop thinking in terms of “frontend versus backend” and start thinking in terms of responsibilities.
[User]
   ↓
[Web UI in the system webview]
   ↓ invoke / emit
[Tauri bridge]
   ↓
[Rust code]
   ↓
[filesystem / OS / network / app state]
   ↓
[result back to UI]
This is also why Tauri feels pleasant for web developers: the UI layer remains in familiar HTML, CSS, and JavaScript, while Rust can focus on the parts that benefit from stronger system access and performance.
10) Run the app in development
Once the project is scaffolded, the CLI is used to run the app in development mode. The docs show tauri dev through different package managers, and note that it uses your build.devUrl and build.beforeDevCommand settings. In practice, that means Tauri can launch your frontend dev server and then attach the desktop shell around it.
Typical development commands look like this:
npm run tauri dev
# or
pnpm tauri dev
# or
cargo tauri dev
That setup gives you hot-reloading for Rust code during development, which makes iteration much more comfortable.
11) Build a release version
When you are ready to ship, the CLI provides tauri build. The official docs say it builds the app in release mode and generates bundles and installers, using build.frontendDist and running the configured frontend build and bundle commands along the way.
Typical build commands include:
npm run tauri build
# or
pnpm tauri build
# or
cargo tauri build
This is the point where your desktop app stops feeling like a development project and starts looking like a product. The code may be yours, but the output is something users can actually install.
12) A simple folder blueprint for your first real app
Once you move past the greeting demo, a slightly more organized layout helps a lot:
src/
├── components/
├── pages/
├── services/
└── main.js

src-tauri/
├── src/
│   ├── lib.rs
│   └── commands/
│       ├── mod.rs
│       ├── greet.rs
│       └── files.rs
└── tauri.conf.json
You can keep UI code in the frontend and push OS-sensitive tasks into Rust. A useful habit is to group commands by feature rather than dumping everything into one giant lib.rs. Tauri’s command system is flexible enough to support that style cleanly.
13) A tiny starter command set for a useful desktop app
Here is a more realistic command trio you might use in a note app, file manager, or utility tool:
#[tauri::command]
fn greet(name: String) -> String {
    format!("Welcome back, {}!", name)
}

#[tauri::command]
async fn save_text(path: String, content: String) -> Result<(), String> {
    std::fs::write(path, content).map_err(|e| e.to_string())
}

#[tauri::command]
fn app_version() -> String {
    env!("CARGO_PKG_VERSION").to_string()
}
And in the frontend:
import { invoke } from '@tauri-apps/api/core';

const version = await invoke('app_version');
await invoke('save_text', {
  path: '/tmp/note.txt',
  content: 'A note from my Tauri app',
});
That small set already covers the three things most desktop apps need early on: a friendly response, a save action, and a way to show app info. Tauri’s command model is a good match for that kind of product-shaped development.
14) Final thoughts
The nicest thing about Tauri is that it does not force you to abandon the stack you already know. You still write your interface with web technologies, but you get a Rust-powered desktop backend and a design that is centered on explicit communication between the two sides. That makes Tauri feel approachable for web developers and still serious enough for real desktop software.
If you are building your first desktop app, start small: scaffold a project, create one Rust command, call it from the UI, and ship a tiny feature end to end. That first loop is where Tauri starts to feel less like a framework and more like a workflow you can trust.